
How to Export Tracks and Stems from a DAW for Mixing
Learn how to render individual tracks from popular DAWs for mixing and mastering. This guide covers export settings, processing, file formats and the checks that help avoid problems when transferring a session to an audio engineer.
Why export individual tracks?
When a project is being mixed, the engineer normally
needs separate audio files rather than the complete
DAW session. Separate tracks let the mix engineer balance vocals, drums, instruments, effects and other elements independently.
A finished stereo mix is usually enough for mastering,
but mixing requires access to the separate elements
of the production. Sending a full DAW project can also
create compatibility problems because it may contain
plugins, instruments, samples or settings that are not
available on the engineer's system.
Exporting the tracks as audio files is usually the safest way to transfer a session for mixing.
Two practical ways to export tracks
Export tracks individually
Solo each required track and render it as a separate audio file. This approach is simple and useful for small sessions, although it can become slow when a project contains many tracks.
Export multiple tracks at once
Most modern DAWs can export several or all tracks at once. This is usually the better option for larger sessions. Keep any processing that is part of the sound you want to preserve, but remove processing that should be recreated during mixing.
Check these settings before rendering
Recommended export settings
DAW-specific export instructions
Select your DAW below to see the basic export workflow and the settings to check before sending your tracks for mixing.
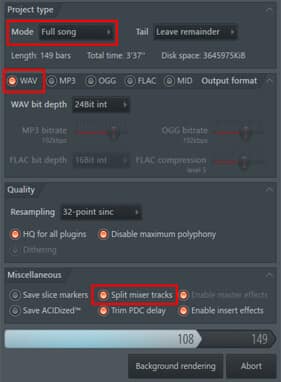
1. Open File → Export → Wave file...
Create a dedicated folder for the exported tracks so the session remains organized.
2. In the export window, check the following:
- Mode = Full Song
- Format = WAV
- Bit depth = match the source project
- Enable “Split mixer tracks” in the Miscellaneous section
3. Start the export. FL Studio will create separate files for the mixer tracks in the selected folder.
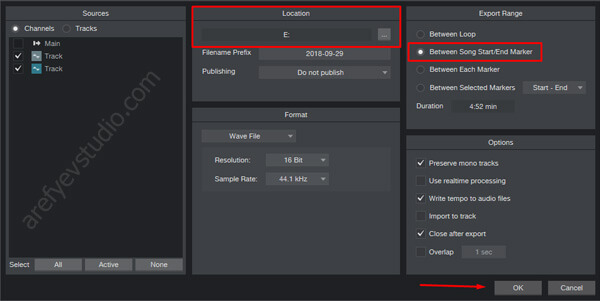
First define the exact export range. Set the song start and end points so that all exported files have the same length and include the required effect tails.
Then choose: Song → Export Stems...
In Export Range select “Between Song Start/End Marker”, choose the destination folder and start the export.
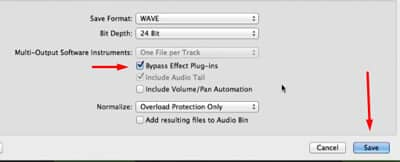
Choose: File → Export → All Tracks as Audio Files...
Select a destination folder and enable “Bypass Effect Plug-ins” if you want to export the tracks without their insert processing. Avoid normalization unless you specifically need it, so the exported files retain their original levels.
Keep effects that are deliberately part of the production when they need to be transferred exactly as heard in the session.
Open: File → Export Audio/Video.
In Rendered Track choose “All Individual Tracks” rather than “Master” when you need separate files for the mixing session.
Export as WAV using the project's original sample rate and an appropriate bit depth. Avoid normalization when preparing files for further mixing.
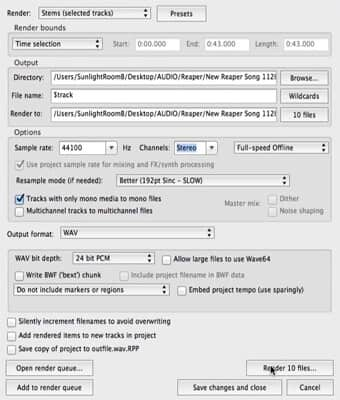
Use the following workflow:
- Open File → Render... (Ctrl+Alt+R).
- Select the tracks that should be exported and choose “Stems (selected tracks)” as the Source.
- Set Bounds to “Time Selection” when a defined export range is required.
- Select the destination directory.
- Use “$track” in File name if you want REAPER to create filenames based on the track names.
- Start the render.
Set the export range before rendering and make sure it covers the complete song, including any required effect tails.
Go to: File → Export → Audio Mixdown...
Enable Channel Batch Export when separate channel files are required. Choose the destination and file naming options, select Wave File as the format and start the export.
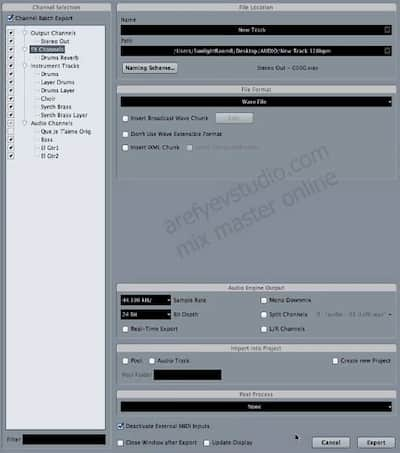
Set the beginning and end points of the song before exporting.
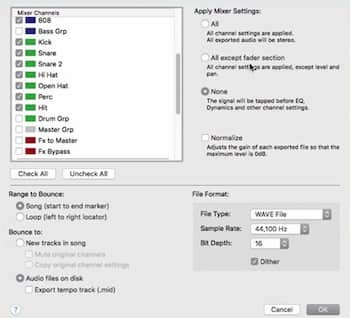
Choose: File → Bounce Mixer Channels.
Select Wave file in the File Format section and use “Check All” under Mixer Channels when you need to export the required channels.
Under “Apply Mixer Settings”, choose “All” to retain mixer processing or “None” when the tracks should be exported without those effects.
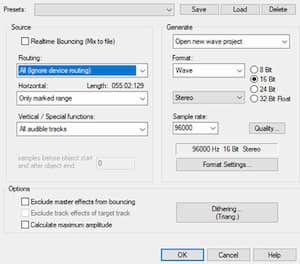
Open: File → Track Bouncing.
In the Routing section, change the destination from “Master” to “All” when you want to create separate files for the tracks.
Confirm the export, select the destination folder and save the rendered files.
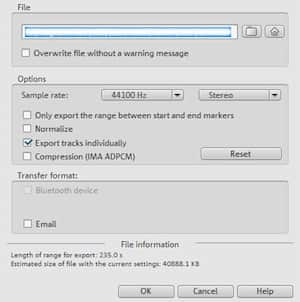
Choose: File → Export → Audio tracks as single WAV files.
In the export options, enable “Export tracks individually” and disable unnecessary options that would alter the exported audio.
Select the destination folder and complete the export.
Ready to send your tracks?
Place the exported files in a clearly named folder or ZIP archive and send them to us. Once we receive the tracks, we can review the project and provide the appropriate mixing or mastering quote.