LUFS Mastering Guide — Why Chasing Loudness Can Ruin Your Track
LUFS measures perceived loudness — but in mastering, it’s not a target.
In mastering, LUFS is used to check loudness after the work is done — not to decide how loud your track should be.
If you start with LUFS, you’re already compromising the result.
This guide shows how to use LUFS without destroying punch, dynamics, or real-world impact.
What LUFS Actually Measures in Mastering (And What It Doesn’t)
 Streaming platforms make this even more misleading. You push your master louder, expecting it to stand out — then normalization pulls it back down.
Meanwhile, a more dynamic track, mastered “quieter,” can actually feel bigger after playback adjustment. That’s where expectations collapse.
Streaming platforms make this even more misleading. You push your master louder, expecting it to stand out — then normalization pulls it back down.
Meanwhile, a more dynamic track, mastered “quieter,” can actually feel bigger after playback adjustment. That’s where expectations collapse.
In mastering, LUFS is used to check how loud a track feels over time — especially after normalization.
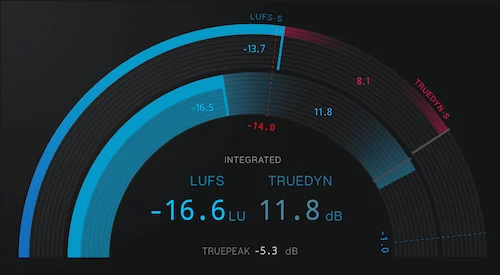
There are three ways LUFS is typically read during mastering. Integrated LUFS shows the average loudness across the entire track. That’s the number most people end up chasing. Short-term LUFS reacts faster, showing how loud a section feels over a few seconds. Momentary LUFS moves almost in real time — it jumps with every hit, every transient.
In real sessions, these readings behave very differently. You can have a chorus that spikes aggressively in momentary loudness but barely shifts the integrated value. Or a track that looks “controlled” on paper, yet feels unstable because short-term loudness is all over the place.
This is where LUFS starts to break down. LUFS is designed to reflect perceived loudness, but it’s still an average. It smooths out what actually matters. It doesn’t fully capture how sharp a snare feels, how deep the low-end sits, or how bright the top end cuts through.
Take two masters at the same integrated LUFS. One keeps transient punch and low-end clarity. The other is heavily limited and flattened. Same LUFS — one hits, the other feels flat.
We see this constantly in real mastering sessions — two tracks matched in LUFS can differ dramatically in perceived punch depending on transient integrity and low-end control.
LUFS alone won’t tell you if a track actually works — it only shows an average, not the real impact. It doesn’t measure punch or depth — and it doesn’t reflect how energy is distributed across frequencies. A track with aggressive high-end will often feel louder than a warmer one, even if LUFS says they’re equal.
Even small processing changes can shift perceived loudness — even if LUFS stays the same. If you want to see how loudness changes in real mastering sessions, it’s worth breaking down how a real mastering chain works in context: mastering chain explained.
So LUFS gives you a reference point — nothing more. It tells you where you ended up, not whether you got there the right way.
LUFS reflects the result — not the decisions behind it.
- LUFS is a measurement, not a target
- Normalization changes playback, not your master
- Dynamics define impact more than loudness
The “-14 LUFS” Myth Why It Misleads Producers
“-14 LUFS for Spotify.” That line alone has probably shaped more bad masters than any plugin ever has.
The number didn’t come from mastering. It came from playback normalization. Spotify needed a consistent listening experience between tracks, so it set an average playback level. That’s it. It’s not a creative target. It’s not a recommendation. It’s a playback adjustment rule.
But somewhere along the way, that number got flipped. Instead of asking “how will this track behave after normalization?”, people started asking “how do I force my track to hit -14 LUFS?” — and that’s where things fall apart.
Here’s what actually happens. If your master is louder than the platform’s reference level, it gets turned down. If it’s quieter, it may be turned up — but only within limits. The platform doesn’t rebuild your dynamics. It doesn’t restore punch. It just adjusts gain.
Now think about the consequence. You push your track harder to control LUFS. You limit more. You shave off transients. You reduce movement. The LUFS number drops into place — looks “correct.” Then the platform turns your track down anyway.
What’s left? A quieter version of an already over-processed master.
Meanwhile, a track that wasn’t forced into a number — one that kept its dynamics intact — might get turned down to the same playback level, but still feels bigger, wider, more alive. Same playback loudness. Completely different perception.
That’s where the result starts falling apart. Matching -14 LUFS doesn’t mean matching how a track feels after normalization. It often does the opposite.
Another problem — normalization isn’t consistent in how people think it works. Playback depends on user settings, device behavior, and how aggressively the original master was pushed. So even if you aim for -14 LUFS, there’s no guarantee the listener hears it the way you expect.
Most of the confusion comes from this mismatch. Normalization is a playback system. Mastering is a sound-shaping process. One adjusts volume. The other defines how the track translates across systems.
Treating -14 LUFS as a target collapses that distinction. It reduces mastering to a number, instead of a set of decisions.
And the result is predictable. Less punch. Less contrast. Less impact. All in exchange for hitting a value that was never meant to guide your mix in the first place.
Loudness vs Dynamics The Trade-Off You Can’t Ignore
Every increase in loudness comes at a cost. That’s not theory — it’s physics inside your signal.
To push LUFS higher, you reduce dynamic range. Peaks get controlled. Quiet parts get lifted. The gap between them shrinks. On a meter, this looks efficient. In sound, it changes how energy is perceived.
Limiting is where this trade-off becomes obvious. As you drive the limiter harder, it starts catching more than just occasional peaks. It begins shaping the entire envelope of the track. Transients — the very thing that gives drums impact and definition — get softened or flattened.
You don’t always notice it immediately. At first, the track just feels “tighter.” Then a bit more “solid.” But push further, and something disappears. The kick stops hitting forward. The snare loses its crack. The groove starts feeling glued in place instead of moving.
At that point, loudness stops adding energy and starts taking it away.
Here’s the contradiction that confuses a lot of producers: a louder track doesn’t automatically feel more powerful. In fact, once dynamics are reduced too much, the track can feel smaller — even if the LUFS number is higher.
Why? Because our ears respond to contrast. The difference between loud and soft, between attack and sustain, is what creates impact. When everything is pushed toward the same level, that contrast disappears. You get density, but not movement.
A common scenario we see: a mix comes in with healthy dynamics, sitting around -12 LUFS after light processing. We regularly receive masters hitting competitive LUFS values that collapse when level-matched against more dynamic versions.
Often, lowering LUFS slightly restores more perceived impact than pushing it further. The producer pushes it to -8 LUFS trying to “compete.” The result measures louder — but feels smaller. When both versions are played back at the same level, the less limited version hits harder.
In many sessions, pushing a track beyond its natural loudness ceiling increases LUFS by less than 1 dB, while noticeably reducing transient clarity. The meter moves — the impact drops.
We’ve seen tracks gain less than 1 dB in LUFS while losing most of their punch — a trade-off that never survives real playback.
In some cases, we’ve seen tracks lose more perceived punch at -8 LUFS than at -11 LUFS — even though the meter shows higher loudness.
Another side effect shows up in distortion. As limiting gets more aggressive, especially in low-end heavy material, artifacts start creeping in. Not always obvious clipping — sometimes it’s subtle smearing, low-end instability, or harshness in the upper mids. These are exactly the kinds of issues that later need correction: how distorted masters happen and how they’re fixed.
And then there’s the opposite mistake. Some tracks are kept too conservative in loudness, but without proper control over dynamics. They end up sounding quiet, not because LUFS is low, but because energy isn’t focused. That’s a different problem entirely: why a track can feel quiet even when levels seem correct.
There’s no way around this. Every increase in loudness changes how the track behaves — sometimes subtly, sometimes irreversibly.
The goal isn’t to make a track as loud as possible. The goal is to make it feel as strong as possible — and those two are not the same thing.
LUFS vs True Peak What Loudness Doesn’t Tell You
 It’s possible to hit the “right” LUFS and still end up with a broken master. That usually surprises people — until they realize LUFS and peak control are solving two completely different problems.
LUFS looks at perceived loudness over time. True peak looks at how high your signal actually goes, including what happens between digital samples. One measures how loud a track feels. The other protects it from clipping.
And here’s where things get messy. A master can sit comfortably at, say, -10 LUFS and still produce clipping after encoding. Not in your DAW — but once it’s converted for streaming. That’s because of inter-sample peaks.
Digital audio doesn’t just live on the visible waveform. When playback systems reconstruct the signal, peaks can rise above what you see on the meter. Those hidden peaks don’t always show up unless you’re measuring true peak specifically.
Now imagine a track that’s already been pushed hard to reach a certain LUFS. The limiter has reduced headroom, peaks are tightly controlled — on the surface, everything looks safe. But after encoding, small overshoots turn into distortion. Not obvious clipping. More like subtle crackle, edge, or loss of clarity.
This is where LUFS alone starts breaking things. It doesn’t account for how the signal behaves after processing stages outside your session. It doesn’t warn you about what happens when the track leaves your control.
Loudness and peak are two separate control systems. One without the other creates blind spots. If you only chase LUFS, you risk pushing the signal into a space where it technically “fits” the number — but fails in real playback conditions.
The balance seems simple — until the track hits real playback systems. You need loudness that translates, and peaks that stay controlled even after encoding. Miss one of those, and the track doesn’t hold up outside your studio.
Platform Normalization Why Loudness Gets Rewritten After Upload
Once your track leaves the studio, loudness is no longer entirely in your control. Streaming platforms apply normalization to create a more consistent listening experience. That means your carefully set LUFS value may not be what the listener actually hears.
Normalization doesn’t improve your master — it only changes playback level. Whatever decisions you made before upload stay exactly as they are.
If your track is louder than that reference, it gets turned down. If it’s quieter, it may be turned up — but only within limits. And that distinction matters. A heavily limited track that gets reduced in volume still carries all the compromises made during mastering. A more dynamic track, even if slightly quieter, often survives normalization with more impact intact.
This is why two tracks can end up playing at similar levels but feel completely different. Normalization reduces loudness differences, but it doesn’t equalize energy, punch, or clarity.
There is no universal LUFS target that works across all platforms. Each system behaves slightly differently, and more importantly — each track reacts differently depending on how it was mastered.
Below is a simplified reference point for how major platforms handle loudness:
| Platform | Approx. Target LUFS | Recommended True Peak |
|---|---|---|
| Spotify | ~ -14 LUFS | ≤ -1.0 dBTP |
| YouTube | ~ -13 to -14 LUFS | ≤ -1.0 dBTP |
| Apple Music | ~ -16 LUFS | ≤ -1.0 dBTP |
What LUFS should you master to?
There is no fixed LUFS target. Most tracks land between -8 and -14 LUFS — but the right level is where your track keeps its punch, balance, and clarity.
If pushing for LUFS changes the character of your track — stop. That’s the limit.
Quick LUFS Reference for Mastering
If you remember one rule: build the sound first — check LUFS last.
- LUFS is not a target — it’s a measurement
- Streaming platforms normalize playback anyway
- More dynamic masters often feel louder after normalization
If your track only works at a specific LUFS value — it’s not stable enough for real playback.
If LUFS defines your decisions, the master is already compromised.
LUFS should confirm your decisions — not replace them.
Good masters are built by sound — LUFS only confirms the result.
These numbers are not targets — they’re playback references. Mastering directly to them doesn’t guarantee better results. In real sessions, it leads to over-processing and loss of dynamics before the platform even applies its own adjustment.
Genre defines loudness more than any number. EDM, hip-hop, acoustic, and cinematic material naturally respond to level very differently. Force them into the same LUFS range, and you start stripping away the thing that made them work in the first place. The goal isn’t to fit a target — it’s to keep the track intact after playback correction.
If you want to see how platform delivery changes real mastering decisions, you can dig deeper into Spotify mastering and YouTube mastering.
Normalization reduces volume differences — but it doesn’t make louder masters more powerful.
How to Use LUFS in Real Decisions Control, Not Target
In practice, LUFS is checked after key decisions are already made — when most of the actual work is already done.
LUFS only matters after your track already feels right — not before. At this stage, you’re not shaping the mix — you’re verifying how far it can be pushed without breaking.
Once the balance feels stable, dynamics are controlled, and the track translates across different playback levels — then LUFS starts to matter. But not as a number to chase. As a reference to confirm you didn’t push too far.
How to Use LUFS in Practice
- Make sure the track feels stable and controlled first
- Check integrated LUFS at the end
- Compare with a reference at equal playback level
- Stop if loudness starts killing punch
A simple reality check we use: if increasing loudness starts changing the character of the track, that’s the limit. Not the LUFS value. The moment the kick loses definition or the groove tightens too much, you’ve crossed the line — even if the meter says you can go further.
Often, pushing beyond that point changes LUFS by less than 1 dB, but alters how the track feels dramatically — especially in the low end.
Another scenario. You reach a certain loudness and everything still feels intact. That point often lands lower than expected — and still outperforms louder masters after normalization. Punch is there. Movement is there. Nothing collapses. That’s usually where the track wants to sit — regardless of whether it lands at -11 LUFS or -8 LUFS.
LUFS becomes useful when you compare. Not when you chase. You check how your master sits relative to references. You see how stable the loudness is across sections. You confirm that the integrated value makes sense for the style — but you don’t force it.
If you want to hear how these decisions translate in a finished master, you can check how we approach loudness and balance in real mastering work: how professional mastering actually translates.
We often see the opposite approach. LUFS first. Everything else second. That leads to predictable problems — over-limited peaks, flattened transitions, inconsistent energy between sections. The number becomes the decision-maker, instead of the sound.
A more reliable approach is almost inverted. Build the track so it holds together under pressure. Let the loudness rise naturally as a result of control, not force. Then check LUFS as a final layer — just to make sure nothing is out of range.
Think of it this way. LUFS doesn’t tell you how to shape a master — that comes from the mastering process itself. It tells you where you ended up after shaping it. If you treat it as a starting point, you’re skipping the part that actually defines the sound.
The difference is subtle, but critical. One approach asks: “How loud can I make this?” The other asks: “How far can I push it before it stops feeling right?”
Only one of those leads to masters that translate.
And in real-world playback, that difference is obvious within seconds.
Numbers don’t tell you how your track feels
LUFS can point you in a direction — but it won’t tell you if your track actually hits. The only way to know is to hear it. Send your mix and get a free demo master (up to 30 seconds), done by a real engineer. No presets. No guesswork. Just a clear before-and-after.
No commitment. Just a real reference of how your track can sound.
Common LUFS Mistakes That Quietly Ruin Masters
 Most LUFS-related problems don’t come from misunderstanding the number itself. They come from how people use it in decisions. The meter isn’t the issue — the interpretation is.
The first mistake is obvious, but still everywhere. Chasing a number as if it defines quality. You set a target, push the limiter until you hit it, and assume you’re done. What usually happens instead is subtle degradation — less punch, less depth, less movement. The track becomes technically “correct,” but sonically smaller.
Another one: ignoring genre context. Not every track is supposed to sit at the same loudness. A dense trap record, an acoustic arrangement, and a cinematic score behave differently under pressure. Forcing them into the same LUFS range removes what makes them work in the first place.
Then there’s the dynamic blind spot. LUFS averages loudness over time, so it hides how energy is distributed. You can crush a mix into a tight range, get a competitive LUFS reading — and still end up with something that feels flat. No lift into the chorus. No contrast between sections. Just a constant wall of sound.
One of the most damaging habits is trusting meters more than your ears. You see the LUFS number land where you expected, and that becomes validation. But meters don’t hear how the vocal sits in the mix. They don’t tell you if the kick lost weight or if the top end became harsh. They just confirm a measurement.
We’ve had cases where a track came in hitting “ideal” LUFS levels, yet translating poorly everywhere — headphones, cars, small speakers. Once we backed off the loudness and restored dynamics, the perceived impact improved immediately, even though the LUFS number dropped.
There’s also a more subtle mistake: adjusting LUFS too early in the process. If you start shaping the track around a target number before the balance is right, every decision becomes biased. You compensate for loudness instead of building a solid foundation. That usually leads to a chain reaction of over-processing.
The pattern is consistent. LUFS is treated as a goal, not a reference. And once that shift happens, every decision starts moving in the wrong direction.
If you want to see how these issues show up in real projects — and how they’re actually corrected — it’s worth looking at a broader breakdown of mastering problems: common mastering issues and how they’re fixed.
LUFS isn’t dangerous by itself. But it’s one of the easiest tools to misuse — because it looks precise, even when it’s hiding the real problem.
LUFS Questions Clear Answers Without the Noise
What LUFS should I master to?
There’s no fixed LUFS target. Most tracks fall between -8 and -14 LUFS, but the right value is defined by how well the track keeps its punch and dynamics after processing.
Is -14 LUFS necessary?
No. It’s a playback reference used by some platforms, not a mastering requirement. For many tracks, forcing -14 LUFS actually reduces impact instead of improving it.
Does louder always sound better?
Only at first. Louder can feel more exciting in short comparisons, but once dynamics are reduced too much, the track loses energy and depth. Perceived power comes from contrast, not just level.
How do I measure LUFS correctly?
Use LUFS as a reference, not a target. Check integrated for overall loudness, short-term for section balance, and momentary for peaks — but always listen alongside the meter. The number alone doesn’t tell the full story.
Can LUFS fix a bad mix?
No. LUFS doesn’t fix balance, tone, or clarity. If the mix has issues, pushing loudness will usually make them more obvious, not less.
Stop guessing loudness
LUFS can guide you, but it won’t tell you if your track actually works. If you want a real answer — you need to hear the difference, not read the number. Get a free demo master and understand how your track translates when it’s done right.
Free demo (up to 30 seconds). Real engineer. No presets.